Hierarchy Properties by Role
Hierarchy Properties are used to create metadata overlay for given hierarchies, enabling users to change hierarchy names and types as required. Non- Admin users can create these overlays for themselves only; other users will not see the changes.
Admins, however, have the option to set hierarchy properties at the role level. This gives them the ability to set an overlay for the hierarchy name and type, and assign roles to that overlay. They can also view and edit that overlay from the Source Manager in the Admin console where they can add other details to the overlay, including a display folder and a description.
Setting hierarchy properties by role offers Admins a simplified way of creating and assigning metadata overlays on-the-fly, while working in Discover.
How to Assign Roles to Hierarchy Properties
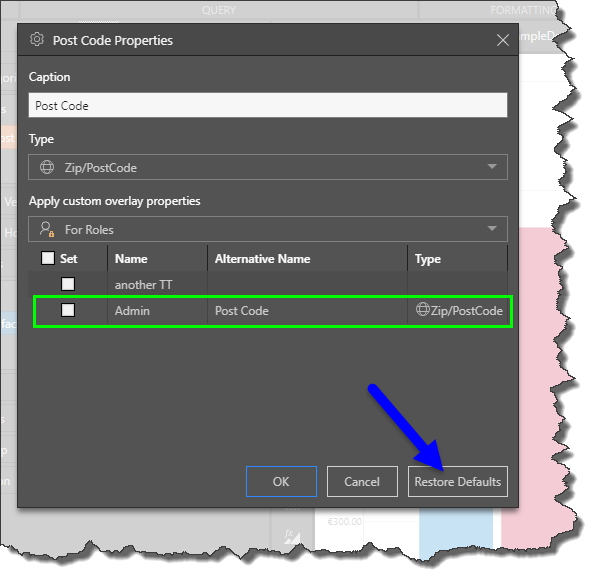
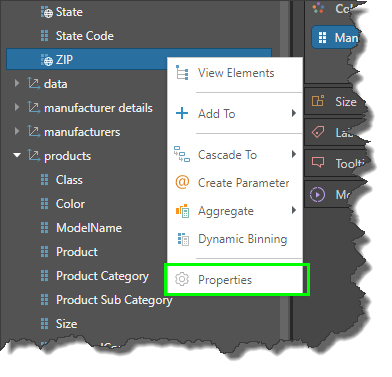
In this example, the caption of the ZIP hierarchy is being changed to Post Code. Open the Hierarchy Properties dialog by right clicking on the relevant hierarchy and selecting Properties.
After setting the hierarchy caption and/ or type, open the 'Apply custom overlay properties' drop-down. By default, this is set to 'For Me', and changes will be applied to you only. To set the overlay for roles, select 'For Roles'.

A list of roles will appear; select the roles that you want to assign to the overlay and click OK.

Users with the given role will see the metadata overlay:

Manage Hierarchy Properties
You can edit the hierarchy properties that you've configured from the Admin console, and from Discover. To edit properties in Discover, open the Properties dialog for the hierarchy for which you set the overlay. You can change the caption and type as usual, and change role security for the overlay.
Any role that is assigned to an overlay in the given hierarchy will display the details of that overlay: the alternative name, and type.
Restore Default Properties
Click Restore Defaults to remove the overlay and revert to the model's default caption and type.